TWiki> Main Web>TWikiUsers>DavidCockerill>GeneralComputingNotes (2022-11-18, DavidCockerill)
 EditAttachPDF
General Computing notes
- Map network to view dfs folders
- Eduroam
- Plot Digitizer
- File transfer, XP Linux with WinSCP
- PC notes
- MAC notes
- Latex
- cmsRun
- Config files
- Python
- C++
- CRAB, Certificates and Grid
- html
- Web page management
- Problem/solution editing a Unix text file on Windows
- Trouble-shooting SSH_starter, PuTTy, zlib.dll
- pptandWord tricks
- Excel to C++ and to Web
- Web searching
- PuTTY sessions
- Batch Jobs in CMS
- Screen saving
- Map Network Drive and pptp
- Edit eps files
- Tar and untar files
- CMS e-groups
- Network connection
- SLC6 installation
- svn
- vnc
- Twiki notes
- Emacs
- XML
- Eduroam
- Windows problems
Map network to view dfs folders
From CERN pc at home:Go to cernts.cern.ch via "Remote Desktop" from the LH vertical bar
In cernts, go to Search (magnifier at bottom lhs of screen)
Enter Map Network
A window comes up with "This PC" on the top bar
At the bottom of the window, icon labelled dfs(\\cern.ch) (G:)
Click on this.
Get the full suite of Users, Workspaces, Websites etc.
Repet to get more windows
Eduroam
RAL MAC RAL-MAC-eduroam-14Jan2020.pdfMy CERN PC CERN-PC-Eduroam-18March2021-The_certificate_expires_in_1_day.pdf
Plot Digitizer
Web sitePlot-Digitizer-README_copy.txt:
File transfer, XP Linux with WinSCP
- WinSCP can be downloaded from CERN CMF to XP
- In CMF, tick in 'Install' column, then click 'save' in the save column to download
- WinSCP will offer 2 windows across which to copy from XP to lxplus and vice versa
- problem logging on - traced to error messages generated via .tcshrc file
- .tcshrc file was requesting an old CMS deprecated lcg area - and was giving long messages as a result
- now request up to date cms lcg area
- now doing 'source .tcshrc' -> no more error messages and WinSCP happy !!
PC notes
Control Panel\System and Security\Systemdcockerill-pc01, EliteDesk PC at home 2020 onwards
Windows 10 Pro, 64 bit, processor 3.00 GHz
Flash Player (32-bit) Printer TS5055 drivers for the PC - found download on Canon website, link
Downloaded win-ts5000-1_0-n_mcd exe file of 16.3 MB
Double clicked on file - took sometime "locating driver/software
Gave window showing progress to total of 70 MB. Needed to try/uninstall a number of times due to slow internet.
Uninstall advice at https://hk.canon/en/support/8203398600
Drivers installed last, an extra 3 MB.
Offered user programs to download - only took 'Quick menu', as on Mac, of 10 MB, Ohers over 100 MB !!!!
START now offers 'Quick menu' and 'IJ scan facility', as on Mac. To see memory stick
Open 'File Explorer' (on bottom bar, 4th across, folder with blue 3 sided rectangle)
See LH column, 'This PC', and all attached items. Click on Mem stick to open. Safely Eject with bottom bar '^' symbol.
MAC notes
How to update MAC link
    MacOS 10.14: Mojave- 2018, will require around 4.8GB of free space
                            Mojave is still the best as Catalina drops support for 32-bit apps,
                            meaning you will no longer be able to run legacy apps and drivers
                            for legacy printers and external hardware as well as a useful application like Wine.
    MacOS 10.13: High Sierra- 2017  <=== current version on my MAC,
                            requires at least 2 GB of RAM and 14.3 GB of available disk space.
    MacOS 10.12: Sierra- 2016.
    OS X 10.11: El Capitan- 2015.
    OS X 10.10: Yosemite-2014.
    OS X 10.9 Mavericks-2013.
    OS X 10.8 Mountain Lion- 2012.
    OS X 10.7 Lion- 2011.
To enable right click on your MacBook trackpad:
    Go to the Apple menu by clicking on the Apple logo at the upper left corner of your Mac's screen.
    Select System Preferences.
    Choose Trackpad.
    Navigate to the Point & Click pane from the Trackpad window.
    Check the checkbox next to Secondary click => tap with 2 fingers.

How do I right click on a MacBook Pro without a mouse?
Hold the "Ctrl" key on the keyboard and press the number "5" on the numeric
Scanner error on TS5055 Re: Suddenly getting error code 15, 156, 0 If you have a Mac this is what I did and it worked for me. 1 - Place image in scanner. 2 - Turn it on. 3 - Go to System Preferences 4 - Click on Printers and Scanners 5 - Click on the Scan button at the top center of the box 6 - Click on the open Scanner button. A grey Scanner box will appear. 7 - Push start on your Scanner and scanning will commence. I hope this helps.Battery condition
Your battery could be swelling making the Trackpad move.
To check the condition of your battery:
hold down the option key and click on the battery icon in the menu bar.
If the condition is anything other than Normal, take your Mac to an Apple Store to get it replaced. Random cursor movements - for MacBook Pro
Apple link
Step 1: Click on the Apple menu and then select Shut Down.
Step 2: Once after your MacBook Pro shuts down, press
Shift + Control + Option keys = Shift + Control + Alt keys
on your keyboard together along with your Power button.
Keep holding down on these keys and the Power button for at least 10 seconds.
Step 3: Now release all the keys and then press the Power button once again to turn on your MacBook Pro.
What does the Option (or Alt) key do?
The Option key has many essential uses on the Mac - in fact for Mac users Option or Alt carries a lot more responsibility than the Alt key does on a PC. One of the most common uses for Option (or Alt) on a Mac is to type symbols and accent marks such as å, ß, ∂ and µ. We cover How to type Æ, , #, @, © and other characters on a Mac separately.
Check out Mac keyboard shortcuts
How to remove malware from a Mac | How to remove malware from your Mac?
    Step 1: Disconnect from the internet. ...
    Step 2: Enter safe mode. ...
    Step 3: Check your activity monitor for malicious applications. ...
    Step 4: Run a malware scanner. ...
    Step 5: Verify your browser's homepage. ...
    Step 6: Clear your cache.
Protect from Malware linkDownload-and-install-Malwarebytes-for-Mac
Login items are apps that open automatically when you start up or log in to your Mac.
Occasionally, a login item may cause a blank blue screen at startup or other problems. Note: To print these instructions, press Command-P.
Test your login items
On your Mac, choose Apple menu > System Preferences, then click Users & Groups.
Click your account name below Current User, then click Login Items at the top of the window.
Make a list of the login items youll need to remember them later.
Select all of the login items, then click the Remove button .
Choose Apple menu > Restart.
If this solves the problem, open Users & Groups preferences again, add the login items one at a time,
and restart your Mac after adding each one.
When the problem occurs again, follow the steps above to remove only the last login item you added.
How to use safe mode link
Determine whether you're using a Mac with Apple Silicon, then follow the appropriate steps:
Apple Silicon
    Shut down your Mac.
    Press and hold the power button for 10 seconds as your Mac starts up.
    Release the power button when you see startup options window.
    Select your startup disk, press and hold the Shift key, click Continue in Safe Mode, then release the Shift key.
    Log in to your Mac. You may be asked to log in again.

Intel processor
    Turn on or restart your Mac, then immediately press and hold the Shift key as your Mac starts up.
    Release the key when you see the login window, then log in to your Mac.
    You may be asked to log in again. On either the first or second login window, you should see "Safe Boot" in
    the top right-hand corner of the window.
If the issue continues in safe mode

If you continue to experience the issue while in safe mode, or your Mac restarts several times and then
shuts down while starting up in safe mode, you should reinstall macOS and make sure your Apple software
and third-party apps are up to date.

If the issue doesn't continue in safe mode
If you don't continue to experience the issue while in safe mode, leave safe mode by restarting your Mac normally.
Then test for the issue again. The issue may have been resolved.

If the issue returns after leaving safe mode, startup items are probably at fault. Apps can install such items in
numerous places, and they aren't always easy to find or recognise. For that reason, you should first make
sure you've installed any available updates for your Apple software and third-party apps.

If updating your software doesn't help, try any of these solutions:
    Test your login items.
    To find out whether software in your user account is causing the issue, set up a new user account,
    then log in to it and try to reproduce the issue in that account.
    Unplug all accessories from your Mac, including printers, drives, USB hubs and other non-essential devices.
    There may be an issue with one or more of these devices or their cables.
    Reinstall macOS.
MAC SELF Service software from CERNInstalled on 20.7.2020.
Within "Self-Service"-->"Configuration" run the policy 'Trust CERN CA Certificates' done.
MAC activity monitor
App memory
To open the app, you can go to Finder > Applications > Utilities > Activity Monitor or you can just search Activity Monitor in Spotlight and open it more quickly. At the bottom of the monitor, youll see a box called memory pressure. If this is high, your computer will be closer to experiencing an out of memory error, but if its low and green (as shown), then youre fine. Any applications highlighted in red are either frozen or not responding. You can force quit them by highlighting the application, and then clicking the X in the top left. Out of app space
If quitting these programs isnt helping relieve pressure, you can see which applications are using the most memory to help identify the problem. The list is automatically sorted by most to least memory used, so examine the names at the top to see if you can notice a particular program causing your problems. You may want to reinstall or delete that app from your Mac. Cleaup and startup
Programs that launch at startup can be a real hassle. Sometimes its useful for instance, I have a background utility that I always want running, so thats beneficial. But other programs may be launching that arent that helpful for example, I dont need to use Powerpoint every time I open my Mac. To turn these programs off, go to Apple Logo > System Preferences. Then choose Users and Groups.
Then, click on the Login Items tab at the top of the window.
To remove a program from the launch list, click on it to select, and then press the minus button. It will no longer launch as soon as you log into your Mac.
To turn these programs off, go to Apple Logo > System Preferences. Then choose Users and Groups. Check for Viruses
Viruses can cause all kinds of wacky behavior from your computer, and although they are less common on Mac, they arent impossible. Here are a few ways to identify a virus: You are getting popups outside of your web browser, or more than normal while browsing. Your Mac is suddenly slow and laggy despite not making any big changes recently. You see a new application on your computer that you dont remember installing. You try deleting an application, but you either cant or every time you do it reappears. If you suspect you have a virus, you can install a program like Malwarebytes for Mac to scan your disk and remove it for you. You can get it for free, and it will clean your computer for you. CleanMyMac has a similar malware-scanning feature if you already own the software. Show hard disks in Finder sidebar
Go to Finder->Preferences->Sidebar.
Check that External disks and hard disks are ticked.
NordVPN
Installed Thurs 26 Sep 2019. Click on app. Select country.
See the NordVPN symbol on top bar, saying "protected". Before, it stated "uprotected"
OS upgrade
Thurs 26 Sep 2019 to macOS High Sierra, version 10.13.4
Used local user admin account, patron of Whales, lc (ahem!!), and usual pwd
Found users using terminal window with:
dscl . list /Users | grep -v '_'MAC-printing-after-os-upgrade.pptx.pdf Security - CyberSafe
Google best 10 vpn
Nordvpn
pwned test
My MAC
Utilities -> System information app
MacBookPro11,1
Processor  2.8 GHz Intel Core i7
Memory  8 GB 1600 MHz DDR3
Graphics  Intel Iris 1536 MB
Boot ROM Version:   MBP111.0138.B16
SMC Version (system):   2.16f58
Serial Number  C02M92JLFH04
Software  macOS High Sierra, version 10.13.4 ( initially was OS X 10.9.5 (13F1911) )
Built-in Retina Display,  2560 x 1600,  Intel Iris 1536 MB graphics
Hardware UUID:   9C62203A-9AD7-5B4B-ABBF-E044688C0586

MacBook Pro Retina 13", Model A1502 made in China - Early 2015.
MacBook Pro models made after the year 2009 have batteries that are non-removable
Showhide hidden files
https://ianlunn.co.uk/articles/quickly-showhide-hidden-files-mac-os-x-mavericks/
- Open "Terminal" found in Finder > Applications > Utilities
- In "Terminal", paste the following:
- defaults write com.apple.finder AppleShowAllFiles YES
- Press return
- Hold the Option (ie alt) key, then right click on the Finder icon in the dock and click Relaunch.
To format the external hard disk (recommended disk size, 1 - 2 TB, my MAC 250 GB):
- the disk probably comes in a formatted state, however this may be for Microsoft rather than for a MAC.
- If it is the wrong format, the MAC will state it cannot connect to the disk
- Check Finder > Preferences, to tick on folders to access
- Use the Disk Utility app via: Finder > Applications > Utilities > Disk Utility app
- See also: how to

- "Erase" the contents of the new disk
- Use one partition, and call it, ie "Backup"
- In the drop down list, choose the MAC format offered at the top of the list
- Start "Time Machine".
- Will see the backup volume already copied vs the total remaining.
- At end, go to Finder to Eject the Backup disk.
- https://www.backblaze.com/mac-backup.html
- https://support.apple.com/mac-backup
- https://apple.stackexchange.com/questions/100780/how-big-should-my-time-machine-backup-drive-be
But this varies greatly, depending on how you use your Mac. If you frequently add/update lots of large files, then even 5 times may not be enough. If you're a light user, you might be able to get 1.5 times to work, but that's subject to problems any time a large backup is needed.
And, of course, the larger the drive, the more old backups Time Machine can keep for you. A drive that's too small may only have room for a few weeks (or even days) of backups.
Unfortunately, it's rather hard to predict, and most of us have a tendency to add more and more data to our systems over time, so if in doubt, get a bigger one than you think you need now.
The size of your drive doesn't really matter, it's the size of your data. If you are really only using 120Gb, then potentially an external drive of 240-360Gb could well be enough (until such time as you start to use more, obviously...) As for how TM works, it doesn't just snapshot the current state of your data, but it's historical changes. This is why it can use more total space than the actual amount of used space on your drive. Let's say that you have your 120Gb current system, and some months down the line you install OS X Mavericks when it's released - this may up your used space to (all figures are estimates!) 130Gb, but it's not just 10Gb worth of extra files, it might be 35Gb of changed files, and 5Gb of new files, resulting in a 40Gb change for Time Machine. This way, when you restore, it's not just a case of being able to restore to the current most recent backup on your TM, but being able to go back in time to any point that it still covers and restore to that point, which may be as far back as prior to OS upgrades etc. Now, for more everyday changes, here's a good example of how you can consume a good amount of space in your backup drive without changing anything. TM backs up at a file level. If a file changes, the new version is backed up in full. Let's say you have a couple of films of a Gb each, but they are named incorrectly (either at a filename or META data level) - changing the title of the films doesn't really affect the space used on your machine, but it will result in both files being backed up again because they have changed.
How to scroll through png files/photos etc
- Highlight one of the files in the folder
- Press the space-bar ==> this should activate "Preview" to open the file
- Use the up/down arrows to go through all the other files
- make a .rootrc file in the home directory, ie Users/david/
- Enter one line: Rint.Logon: {HOME}/rootlogon.C
- Note: Rint.Logon: ~/rootlogon.C seems not to work
- open a terminal window
- cd to folder containing the zip file
- then, on the command line: $unzip filename
By default, rootlogon.C is called only if it exists in the directory you call root from.
So if you call root from your home directory root only executes rootlogon.C if one exists in your home directory.
If, however you want rootlogon.C to be called independant of the directory youre in you can
- Open up the directory root is installed to and open the etc file inside
- On my MAC direcory/file at: /Users/david/Downloads/root/etc/system.rootrc
- Inside there is a file system.rootrc that you need to edit
- Find the line Rint.Logon: rootlogon.C, now change this line to Rint.Logon: /path to file/rootlogon.C
~/.rootrc
and include this line:
Rint.Logon: ~/rootlogon.C
Useful bash notes
https://natelandau.com/my-mac-osx-bash_profile/
With the memory stick attached:
Open a terminal window and type "srm -v "
Drag file/files from trash to the point after the space - and see them deleted one by one. MAC -> System Preferences -> General for interfaces Installing programs
OS may refuse to install a "package from unidentified developer".
In this case select "Open" from the context menu with a right-clik on the installation package. MAC terminal window size
- click on terminal to open a terminal window
- Click on "Terminal" on the mac bar at top of screen
- Go to Settings->Window and edit "Window Size" to suit.
Launch Preview, in Launchpad.
Choose File > Open and navigate to the folder containing the photos.
Select the folder and click Open.
In Preview, go to View and check Thumbnails to get a list of thumbnails on the left side of Preview.
Navigate with the left and right arrows on the keyboard to scroll through the photos.
Copy from a pc Watch out for " versus "quotes with a twiddle" (perhaps from a file from a PC) Edit .bash_profile in david to set up aliases etc WorkingWithaMac.pdf
defaults write com.apple.finder AppleShowAllFiles YES
killall Finder
then, double finger click on hidden file in Finder for "open with" and choose, for example aquamacs Locating screens
- cmd-"apostrophe" to circulate through one type, ie all open Firefox screens
- F3 - to see all screens
- F4 - to see all apps
- F1, F2 to brighten/darken display
- Step 1: Download the CERNAddPrinter App
- Step 2: Click on the printer icon, wait for installation to complete
| rename a file or folder | click to highlight name, type return and change name |
| cmd-shift-3 | whole screen dump |
| cmd-shift-4 | capture active window, cross hair highlight |
| (PC is Alt + PrtScrn) | |
| ssh -Y usrn@lxplus.cern.ch | to avoid 20' drop out with -X |
| cmd-N | new window |
| euro symbol | alt + button |
| hash symbol | alt + button |
| Triple click | Highlight whole line |
| Tab | Fill in rest of line |
| Double click | Highlight then cmd-C to copy |
| Status bar | In Finder-> View->Show status bar |
| cmd-T | New tab |
- highlight the text/filename
- drag (with thumb down on the TrackPad, finger doing the dragging)
Apple link
- Press Command (⌘)-Shift-4. You'll see that your cursor changes to a camera pointer.
- Press the Space bar.
- Move the camera pointer over the window to highlight it.
- Click your mouse or trackpad. Or to cancel, press Escape (esc) before you click.
- Find the screenshot as a .png file on your desktop.
- Command + Shift + 4
- - a new bullseye-like cursor will appear, and you can drag to select the area of the screen for the screenshot
- Command + Shift + 3
- - this will take a screenshot of the entire screen
On Mac OS X Snow Leopard as well as Mac OS X Lion, the file that's loaded is called .profile, not .bashrc.
What you want to do is create a file in ~/.profile and call it .profile (if it doesn't already exists).
Put whatever information you needed to load with each instance of bash there
A couple of side notes:
The period in front of the file marks it as invisible to Finder and the "ls" command by default.
To list invisible files using the "ls" command from Terminal, use the -a as a parameter as such: ls -a
The ~ symbol stands for /Users/YourUserName where YourUserName is your username's shortname.
Whatever you place in a .profile file will apply to whatever shell you're using (i.e. zhs, bash, et cetera).
If you want the contents to affect only the bash shell, place the contents in a .bash_profile file instead of a .profile file.
MAC printing from ppt
Turn off compression
- Click File > Options.
- In the Options box, click Advanced.
- In the list at Image Size and Quality, do one of the following. (This example shows the options in Word.)
- Under Image Size and Quality, select the Do not compress images in file check box.
- File->Save as Pictures or
- File->Export, and choose jpeg

2. Then print the jpg file:
Printer settings:
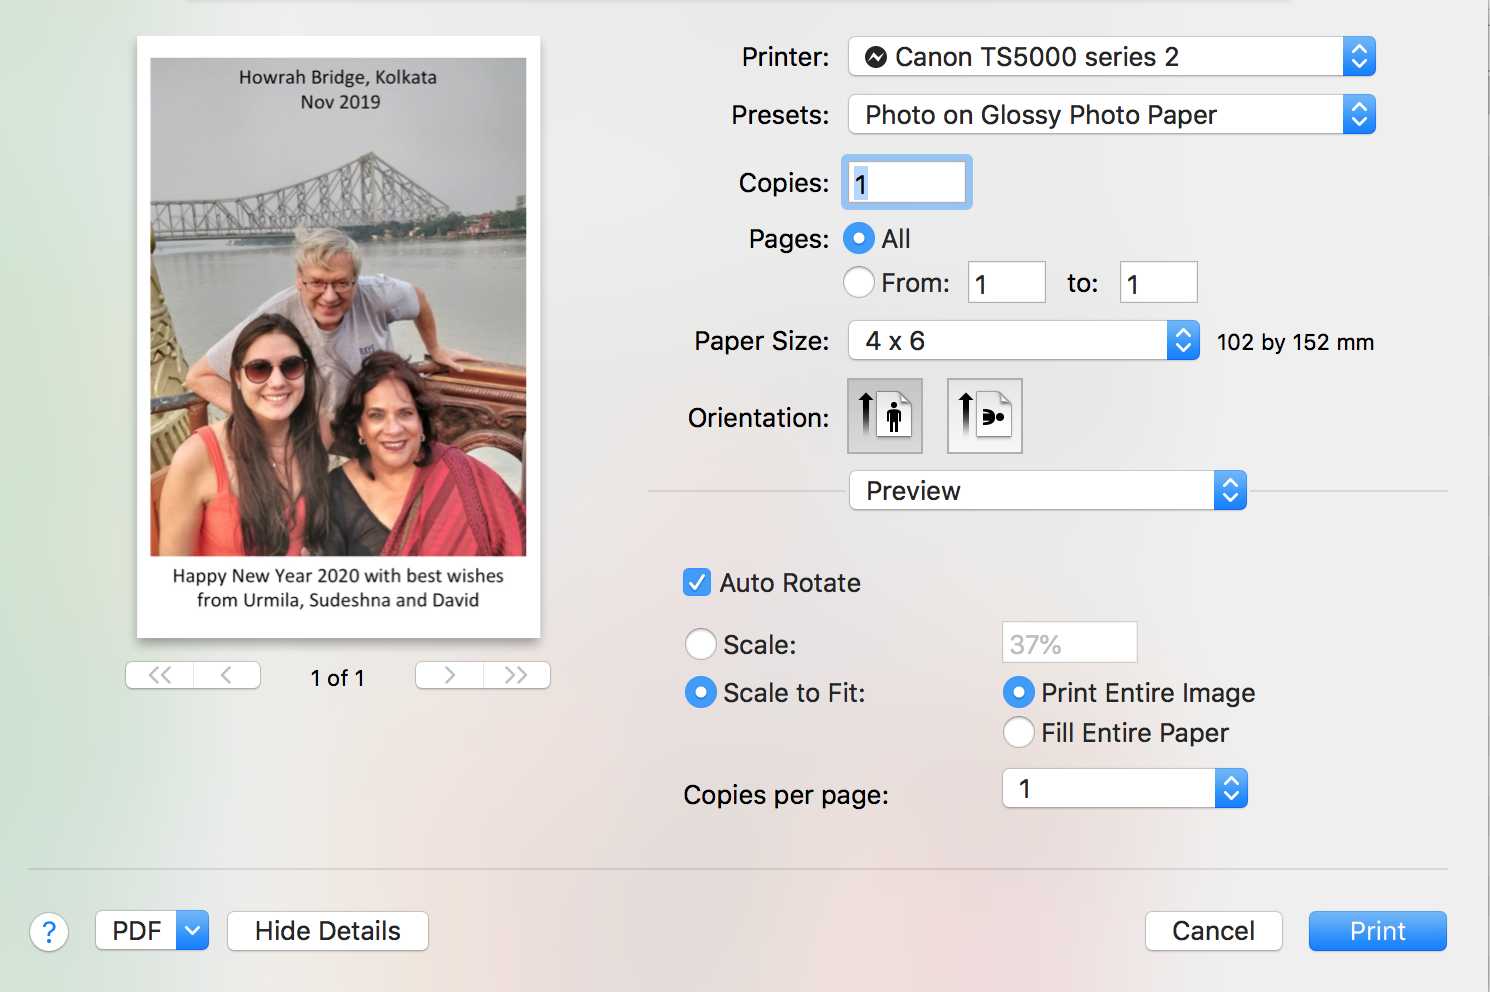
Note carefully:
- Presets: Photo on Glossy Photo Paper (if leave on defauls, get Paper settings and a rather washed out print)
- Paper Size: 4x6
- Scale-to-fit
- Print Entire Image or
- Fill Entire Paper -> Print
| One XL ink | Pack of all 5 XL inks | 570 PGBK | 571 BK, M, Y, C | |
| Media Markt | 23 CHF | 70 CHF | 40 sheets Epsom 18 CHF | 100 sheets CANON 15 CHF |
| Migros | 17 euros = 18.5 CHF | 49 euros pack of 4 (no PGBK) = 53.5 CHF | 50 sheets, Cora = 5 euros = 5.5 CHF |
web link
Open the image youd like to convert with Preview on your Mac (usually the default)
In the top left corner Click File → Duplicate
You can rename the new file or leave the default (it just adds copy to the original)
Close the window of the duplicate, click the drop down next to Format
Select JPEG, adjust the quality if desired, click Save
Youve now got a JPG version of your image
- You can rename what will be the JPG version of the image or leave the default. Now close the image duplicate.
- Now click the Format dropdown as shown below and select JPEG.
- Adjust the quality if youd like (lower quality will result in a smaller file, higher quality will create a larger file).
Alternately, if you import an image to the Photos app and make any edits, it will be saved as a JPG. You can check the format of any image by clicking on it and using the keyboard shortcut command + I (or right-click and select Get Info).
MAC to ROOT at CERN 1) Use XQuartz to open a terminal to ssh -XY to cern


2) Use MAC terminal to get/send edited files to CERN
$ scp davec@lxplus6NOSPAMPLEASE.cern.ch:~davec/EE-MC-losses/amina-mc-data.C .

3) Use Aquamax on the MAC to edit files
 MAC with downloaded ROOT
 30 March 2021 - trying to run root:
error: PCH file was compiled for the target 'x86_64-apple-macosx10.9.0' but the current translation unit is being compiled for target
      'x86_64-apple-macosx10.13.0'
input_line_1:1:10: fatal error: 'new' file not found
Need to execute:
. /Users/david/Downloads/root/bin/thisroot.sh
- Put this string into profile_bash located into top folder /david/
- do u+x to make file executable
- File will be run at each logon
source bin/thisroot.sh
or
source /Users/david/Downloads/root/bin/thisroot.sh ROOT on the MAC seems fussier than on the PC.
Didn't allow single TLatex command to define object: "TLatex t(0.01,0.9,"Some text"); Had to declare t and then do: t.DrawLatex(0.01,0.9,"Some text"); Didn't accept -> and . equivalence when running with .x Toggling
- Toggling between open programs is Command + Tab
- Toggling up a minimized program is Command + Tab with Option on release
- Toggling between tabs is Command + Shift + [ or ]
- Opening a new tab is Command + t
- Closing a tab or window is Command + w
- Toggling windows of the same application is Command + `
ssh manual
ssh usrn@lxplusNOSPAMPLEASE.cern.ch
If X11 forwarding is enabled on both computers, you can access that functionality by typing:
ssh -X remote_host
Providing you have the appropriate tools on your computer, GUI programs that you use on the remote system will now open their window on your local system.
OpenAFS for MAC OS at CERN
scp files from lxplus to the MAC
scp help page
Copy the file "foobar.txt" from a remote host to the local host
$ scp your_username@remotehost.edu:foobar.txt /some/local/directory

Copy the file "foobar.txt" from the local host to a remote host
$ scp foobar.txt your_username@remotehost.edu:/some/remote/directory

Copy the directory "foo" from the local host to a remote host's directory "bar"
$ scp -r foo your_username@remotehost.edu:/some/remote/directory/bar

Copy the file "foobar.txt" from remote host "rh1.edu" to remote host "rh2.edu"
$ scp your_username@rh1.edu:/some/remote/directory/foobar.txt \ your_username@rh2.edu:/some/remote/directory/

Copying the files "foo.txt" and "bar.txt" from the local host to your home directory on the remote host
$ scp foo.txt bar.txt your_username@remotehost.edu:~

Copy the file "foobar.txt" from the local host to a remote host using port 2264
$ scp -P 2264 foobar.txt your_username@remotehost.edu:/some/remote/directory

Copy multiple files from the remote host to your current directory on the local host
$ scp your_username@remotehost.edu:/some/remote/directory/\{a,b,c\} .
$ scp your_username@remotehost.edu:~/\{foo.txt,bar.txt\} .
ssh errors with a MAC
@@@@@@@@@@@@@@@@@@@@@@@@@@@@@@@@@@@@@@@@@@@@@@@@@@@@@@@@@@@
@ WARNING: POSSIBLE DNS SPOOFING DETECTED! @
@@@@@@@@@@@@@@@@@@@@@@@@@@@@@@@@@@@@@@@@@@@@@@@@@@@@@@@@@@@
The RSA host key for lxplus.cern.ch has changed,
and the key for the corresponding IP address 137.138.31.53
is unknown. This could either mean that
DNS SPOOFING is happening or the IP address for the host
and its host key have changed at the same time.
@@@@@@@@@@@@@@@@@@@@@@@@@@@@@@@@@@@@@@@@@@@@@@@@@@@@@@@@@@@
@ WARNING: REMOTE HOST IDENTIFICATION HAS CHANGED! @
@@@@@@@@@@@@@@@@@@@@@@@@@@@@@@@@@@@@@@@@@@@@@@@@@@@@@@@@@@@
IT IS POSSIBLE THAT SOMEONE IS DOING SOMETHING NASTY!
Someone could be eavesdropping on you right now (man-in-the-middle attack)!
It is also possible that a host key has just been changed.
The fingerprint for the RSA key sent by the remote host is
ae:a7:6c:dd:84:05:8e:6e:27:29:8f:e2:90:d1:b0:07.
Please contact your system administrator.
Add correct host key in /Users/david/.ssh/known_hosts to get rid of this message.
Offending RSA key in /Users/david/.ssh/known_hosts:1
RSA host key for lxplus.cern.ch has changed and you have requested strict checking.
Host key verification failed.
Solution:
From the finder go to - david - .ssh , then rename the file "known_hosts" (use for e.g : known_hosts_old)
If you don't see the folder ".ssh" please use the link below to show hidden folder" :
https://ianlunn.co.uk/articles/quickly-showhide-hidden-files-mac-os-x-mavericks/
Latex
- CTAN (Comprehensive Tex Archive Network)
- beginners LaTex
- Tutorials
- Line numbering
- Tutorial - graphics
- Latex symbols
- Latex line breaks etc
- Floats, Figures and Captions
- \usepackage{graphicx} to load up other image types, ie pdf, jpg etc
- latex file.tex
- xdvi foo.dvi & to look at the dvi file.
- dvipdf foo.dvi to convert from dvi to pdf
- dvips -Pcmz foo.dvi -o foo.ps to convert from dvi to ps
- No line numbering in certain sections, include a space line after the equation
- \rightarrow
- \pi
- \gamma
- \mu
- \nu
- \pm
- x^y , x^{yz}
cmsRun
Config files
Python
- Python Documentation
- Python tutorial
- Python tips
- Python on Windows
- Python FAQs
- Downloads
- Dates in python
- Ball, Imperial, tutorial_2011.pdf
- Wilkinson, Hegner, 31.7.2008, CMS Python tutorial
- cmsenv
- python myscript_cfg.py
- Python has five standard data types:
- Numbers String List Tuple Dictionary
Must remove / in file address above and replace with "." !!!!!!!!!!!!!!!!, as in:
import RecoMET.METFilters.eeBadScFilter_cfi as Filter"Filter" points to the file NOT the contents !!!
Need phrases such as those below to access particular objects/members:
import eeBadScFilter_cfi as Filter
print "\n\nFrom my local copy of eeBadScFilter_cfi.py, eeBadScFilter.EminHit = ", Filter.eeBadScFilter.E
minHit
print "From my local copy of eeBadScFilter_cfi.py, eeBadScFilter.badscEE = ", Filter.eeBadScFilter.badsc
EE
#process.extend(Filter)
Make the EE filter:
process.EEFilt = Filter.eeBadScFilter
print "\n process.EEFilt = ", process.EEFilt

process.demo = cms.EDAnalyzer('RecoAnalyzer',
                                                     ....etc..........,
                                                     MyTag = cms.untracked.string(Tag)
)
Include filter in the analysis process, and print the processes:
process.p = cms.Path(process.EEFilt*process.demo)

print "\nprocess.p = ",process.p
print "\nprocess = ", process
print "\nprocess.demo = ",process.demo
class Process
class Process(object) etc in cmssw/FWCore/ParameterSet/python/Config.py This is the main config file for importing all the parameters: Set up in py file with:
import FWCore.ParameterSet.Config as cms
process = cms.Process("Demo")

#Setup useage:
process.demo = cms.EDAnalyzer('RecoAnalyzer',

process.load("Configuration.StandardSequences.FrontierConditions_GlobalTag_cff")
Some particular code lines:
..............
class Process(object):
..............
..............
# some user-friendly methods for command-line browsing
def producerNames(self):
"""Returns a string containing all the EDProducer labels separated by a blank"""
return ' '.join(self.producers_().keys())
def analyzerNames(self):
"""Returns a string containing all the EDAnalyzer labels separated by a blank"""
return ' '.join(self.analyzers_().keys())
def filterNames(self):
"""Returns a string containing all the EDFilter labels separated by a blank"""
return ' '.join(self.filters_().keys())
def pathNames(self):
"""Returns a string containing all the Path names separated by a blank"""
return ' '.join(self.paths_().keys())

Usage:
print "\n\nFrom cmssw/FWCore/ParameterSet/python/Config.py: "
#print processes
print "process.producerNames() = ", process.producerNames()
print "process.analyzerNames() = ", process.analyzerNames()
print "process.filterNames() = ", process.filterNames()
print "process.pathNames() = ", process.pathNames()

Output:
From cmssw/FWCore/ParameterSet/python/Config.py:
process.producerNames() =
process.analyzerNames() =  demo
process.filterNames() =  EEFilt
process.pathNames() =  p
cmssw/FWCore/Framework/src/EDAnalyzer.cc Has doEvent, doBeginJob(), doEndJob() etc and static const std::string kBaseType("EDAnalyzer"); cmssw/FWCore/Framework/interface/EDAnalyzer.h Has all the beginJob, endJob stuff etc:
class EDAnalyzer : public EDConsumerBase {
................
virtual void analyze(Event const&, EventSetup const&) = 0;
virtual void beginJob(){}
virtual void endJob(){}
virtual void beginRun(Run const&, EventSetup const&){}
virtual void endRun(Run const&, EventSetup const&){}
virtual void beginLuminosityBlock(LuminosityBlock const&, EventSetup const&){}
virtual void endLuminosityBlock(LuminosityBlock const&, EventSetup const&){}
Python crib:
| built in functions | functions.html | |
| getattr(object, name[, default]) | Return the value of the named attribute of object. | |
| name must be a string. If the string is the name of one of the objects attributes, the result is the value of that attribute. | ||
| For example, getattr(x, 'foobar') is equivalent to x.foobar. | ||
| If the named attribute does not exist, default is returned if provided, | ||
| otherwise AttributeError is raised. | ||
| indeces | Strings can be subscripted (indexed); There is no separate character type; a character is simply a string of size one. | |
| substrings can be specified with the slice notation: two indices separated by a colon. | ||
| an omitted first index defaults to zero, an omitted second index defaults to the size of the string being sliced. | ||
| word = 'Help' + 'A' | ||
| word[4] = 'A' , word[0:2] 'He' ,word[2:4] = 'lp' | ||
| word[:2] The first two characters, 'He', word[2:] Everything except the first two characters 'lpA' | ||
| a, b = 0, 1 | simultaneous assignments, right hand side into left hand side | |
| print b, | use of comma to keep printing on same line | |
| loops | while b < 10: | |
| for | The for statement in Python differs from that used in C or Pascal. | |
| Rather than always iterating over an arithmetic progression of numbers (as in Pascal), or giving the user the ability to define both the iteration step and halting condition (as C), | ||
| Pythons for statement iterates over the items of any sequence (a list or a string), in the order that they appear in the sequence. | ||
| for iterating_var in sequence: statements(s) | ||
| If a sequence contains an expression list, it is evaluated first. Then, the first item in the sequence is assigned to the iterating variable iterating_var. | ||
| Next, the statements block is executed. | ||
| Each item in the list is assigned to iterating_var, and the statements(s) block is executed until the entire sequence is exhausted. | ||
| There may be 2 iterating_var variable for a set of key:value pairs | ||
| words = ['cat', 'window', 'defenestrate'] | ||
| for w in words: | ||
| print w, len(w) , gives cat 3 window 6 defenestrate 12 | ||
| operators in and not in | test for collection membership. x in s evaluates to true if x is a member of the collection s, and false otherwise. | |
| x not in s returns the negation of x in s. | ||
| string | Strings in Python are identified as a contiguous set of characters in between quotation marks. | |
| Python allows for either pairs of single or double quotes. Subsets of strings can be taken using the slice operator ( [ ] and [ : ] ) with indexes starting at 0 in the beginning of the string and working their way from -1 at the end. | ||
| The plus ( + ) sign is the string concatenation operator, and the asterisk ( * ) is the repetition operator. | ||
| ie str = 'Hello World!' | ||
| print str | Prints complete string | |
| print str[0] | Prints first character of the string | |
| print str[2:5] | Prints characters starting from 3rd to 5th | |
| print str[2:] | Prints string starting from 3rd character | |
| print str * 2 | Prints string two times | |
| print str + "TEST" | Prints concatenated string | |
| list | Lists are the most versatile of Python's compound data types. | |
| A list contains items separated by commas and enclosed within square brackets ([]). | ||
| Lists are similar to arrays in C. One difference between them is that all the items belonging to a list can be of different data type. | ||
| The values stored in a list can be accessed using the slice operator ( [ ] and [ : ] ) with indexes starting at 0 in the beginning of the list and working their way to end-1. | ||
| ie list = [ 'abcd', 786 , 2.23, 'john', 70.2 ], see string for print examples | ||
| The plus ( + ) sign is the list concatenation operator, and the asterisk ( * ) is the repetition operator. | ||
| tuple | A tuple is another sequence data type that is similar to the list. | |
| A tuple consists of a number of values separated by commas. Unlike lists, however, tuples are enclosed within parentheses. | ||
| ie tuple = ( 'abcd', 786 , 2.23, 'john', 70.2 ) | ||
| The main differences between lists and tuples are: Lists are enclosed in brackets ( [ ] ), and their elements and size can be changed, | ||
| while tuples are enclosed in parentheses ( ( ) ) and cannot be updated. | ||
| ****** Tuples can be thought of as read-only lists. ********** | ||
|---|---|---|
| print tuple[1:3] | Prints elements starting from 2nd till 3rd. Syntax as for strings and lists. | |
| dict | Dictionaries can be created by placing a comma-separated list of key:value pairs within braces | |
| Python's dictionaries are kind of hash table type. | ||
| They work like associative arrays or hashes found in Perl and consist of key-value pairs. | ||
| A dictionary key can be almost any Python type, but are usually numbers or strings. | ||
| Values, on the other hand, can be any arbitrary Python object. | ||
| Dictionaries are enclosed by curly braces ( { } ) and values can be assigned and accessed using square braces ( [] ). | ||
| example: {'jack': 4098, 'sjoerd': 4127} or {4098: 'jack', 4127: 'sjoerd'}, or by the dict constructor. | ||
| dict = {} | ||
| dict['one'] = "This is one" | ||
| dict[2] = "This is two" | ||
| tinydict = {'name': 'john','code':6734, 'dept': 'sales'} | ||
| print dict['one'] | Prints value for 'one' key --> This is one | |
| print dict[2] | Prints value for 2 key --> This is two | |
| print tinydict | Prints complete dictionary --> {'dept': 'sales', 'code': 6734, 'name': 'john'} | |
| print tinydict.keys() | Prints all the keys --> ['dept', 'code', 'name'] | |
| print tinydict.values() | Prints all the values --> ['sales', 6734, 'john'] | |
| Dictionaries have no concept of order among elements. | ||
| It is incorrect to say that the elements are "out of order"; they are simply unordered. | ||
| ret.obs = dict( [ (b,ret.obs[i]) for i,b in enumerate(ret.bins) ] ) <== from DatacardParser.py | ||
| Conversion | Data Type Conversion: see Conversion |
|
| enumerate | returns a tuple containing a count (from start which defaults to 0) and the values obtained from iterating over sequence | |
| seasons = ['Spring', 'Summer', 'Fall', 'Winter'] | ||
| list(enumerate(seasons)) | ||
| [(0, 'Spring'), (1, 'Summer'), (2, 'Fall'), (3, 'Winter')] | ||
| list(enumerate(seasons, start=1)) | ||
| [(1, 'Spring'), (2, 'Summer'), (3, 'Fall'), (4, 'Winter')] | ||
| equiv to def enumerate(sequence, start=0): n = start for elem in sequence: yield n, elem n += 1 | ||
| class | class Point: | |
| def __init( self, x=0, y=0): | ||
| self.x = x self.y = y | ||
| def __del__(self): | ||
| class_name = self.__class__.__name__ | ||
| print class_name, "destroyed" | ||
| Class Inheritance | class Child(Parent): define Child class, inheriting from class Parent | |
| def __init__(self): | ||
| print "Calling child constructor" | ||
| def childMethod(self): | ||
| print 'Calling child method' | ||
| Overriding Methods | class Parent: # define parent class | |
| def myMethod(self): | ||
| print 'Calling parent method' | ||
| class Child(Parent): # define child class | ||
| def myMethod(self): | ||
| print 'Calling child method' | ||
| c = Child() # instance of child | ||
| c.myMethod() # child calls overridden method | ||
| s[i] = x | item i of s is replaced by x | |
| s[i:j] = t | slice of s from i to j is replaced by the contents of the iterable t | |
| del s[i:j] | same as s[i:j] = [] | |
| s[i:j:k] = t | the elements of s[i:j:k] are replaced by those of t (1) | |
| del s[i:j:k] | removes the elements of s[i:j:k] from the list | |
| s.append(x) | same as s[len(s):len(s)] = [x] (2) | |
| s.extend(x) | same as s[len(s):len(s)] = x (3) | |
| s.count(x) | return number of is for which s[i ] == x | |
| s.index(x[, i[, j]]) | return smallest k such that s[k] = x and i < k < j (4) |
|
| s.insert(i, x) | same as s[i:i] = [x] (5) | |
| s.pop([i]) | same as x = s[i]; del s[i]; return x (6) | |
| s.remove(x) | same as del s[s.index(x)] (4) | |
| s.reverse() | reverses the items of s in place (7) | |
| s.sort([cmp[, key[, reverse]]]) | sort the items of s in place (7)(8)(9)(10) | |
C++
CRAB, Certificates and Grid
cms VO Registration~/.globus $ voms-proxy-init --voms cms Enter GRID pass phrase: Your identity: /DC=ch/DC=cern/OU=Organic Units/OU=Users/CN=davec/CN=382975/CN=Dave Cockerill Creating temporary proxy .............................................. Done Contacting voms2.cern.ch:15002 [/DC=ch/DC=cern/OU=computers/CN=voms2.cern.ch] "cms" Done Creating proxy ......................................................... Done Your proxy is valid until Sun Nov 30 00:15:20 2014
CRAB 3
Seem to need bash for many of the setupsCRAB3Tutorial
CRAB3CheatSheet
CRAB3ConfigurationFile Workbook: 5.6 Data Analysis with CRAB production sites
- Certificate valid on any platform: PC, laptop etc.
- A NEW certificate must be made each year, see below (first one expired on 6.3.2010).
- Mozilla - tools - option - encryption. In the 'Certificates' field, choose button 'Select one automatically'.
- View cert - your cert -> double click to see cert.
- At present tied to Moz on Nice - need to export to use elsewhere with any NICE/Mox combo
- Backup - called 'cert-2009.p12' stored in folder 'certificate' on my dfs area
- IE - tools - init opts - content - certs - import (mark cert as exportable??)
- scroll to CMS and details
- https v0&ro = cms -> enrolment url - I am a member of the CMS vo
- Moz - Edit - Pref - Advanced - Encryp
- view certificate, highlight it and import (under YOUR certs)
- If the directory needs to be made then do mkdir .globus
- www.grid-support.ac.uk
- UK NGS (National Grid Service) run at RAL
- I want LCG, LHC computing grid, doc - UK cert -> how to - preparing for globus
- Cert - 2 parts, convert into .globus -> public and private } asym encryption parts vice-versa tool
- Private cert part - PEM pass phrase - needed for work on grid (I set same as for 'cert-2009')
- See How to use your certificate with grid-proxy-init to use the certificate
- Store Mozilla certificate in 'private' folder so that it is not publically visible
- openssl pkcs12 -in myCert.p12 -clcerts -nokeys -out $HOME/.globus/usercert.pem
- openssl pkcs12 -in myCert.p12 -nocerts -out $HOME/.globus/userkey.pem
- chmod go-rw $HOME/.globus/userkey.pem otherwise grid-proxy-init will not use it
- To transfer text from XP to putty lxplus window, highlight text -> rh click -> copy. In lxplus window, rh click to paste the text
- security CHMOD 644 (bit mask) - user read and write, 600 - only user can rw, 700 = urwx
- Problem of 3 certificate versions listed, but out of date cert held by Mozilla
- revoke all 3 here, in the box 'List and revoke certificates' (in future, can make a new cert and test if it is OK - if both certs still valid - Mozilla will ask which you wish to use)
- In Mozilla, remove old certificate. Mozilla -> Tools -> Options -> View cert -> highlight certificate in question and delete
- Start again by requesting a new certifcate with Mozilla (if accessing IT page via Mozilla) here
- See How to use your certificate with grid-proxy-init to use the certificate
- In Mozilla, backup (export) certificate. Mozilla -> Tools -> Options -> View cert -> highlight certificate in question and backup to any dfs folder
html
- How to write plain simple HTML
- Learn to create websites
- HTML Tutorial
- Subscripting etc
- html characters, spaces etc
Web page management
Firefox history, passwod storageFirefox profile
Pin firefox webpage
Open Firefox and navigate to the Web page you want to pin. In the address bar, you'll see a small icon (padlock) to the left of the URL.
Click and hold this icon and drag it onto the desktop to create a shortcut to the Web page.
PPD EE web pages
2019, move by Kevin to change "groups" to "Private"
This PC -> PPD Files(T:) -> WWW -> Projects -> private-CMSecal
for all the html files and folders with files

http://hepwww.rl.ac.uk/CMSecal/Crystals.htm ->  https://hepwww.pp.rl.ac.uk/Private/CMSecal/Crystals.htm
NOTE:
http://hepwww ==> https://hepwww.pp
/CMSecal/ ==> /Private/CMSecal/

NOTE2:
Changed files with .kumac or .dat to .txt, otherwise browser didnt find or understand file.
CMS CERN web pages
CMS setup, Accounts, Group Memberships, Certificates, pac files, etc.
Go to here
Go to here
Problem/solution editing a Unix text file on Windows
Having edited a Unix text file on XP (e.g. with Notepad) the format is now wrong There is a difference between Unix and DOS/Windows systems in the way text files are stored. On Unix systems each line is terminated with a line-feed character. On DOS/Windows systems each line ends with both carriage-return and line-feed characters. Problems can occur if, for example, you edit a Unix text file (e.g. on your U drive) using the Windows Notepad application. A solution to this problem is to use the PFE (Programmers File Editor) (Start Menu - Programs - General Utilities - PFE). The status bar in the PFE window has an operating system field (labelled Unix or DOS). Double-clicking this field changes the setting, and enables you to save the file in the appropriate format. See the PFE help for more details.Trouble-shooting SSH_starter, PuTTy, zlib.dll
zlib.dll error when starting SSH.exe * Copy zlib.dll and gmp.dll from S:\bin to C:\Program Files\PuTTY. As off 28/3/08 theses files have been added to the scripted installation. Computer and users Environment Variables * Right click on My Computer and select - Properties, then the Advanced tab, then Environment Variables. After editing theses settings you will need to reboot the computer. User variables * Make sure you have Display set to the computer name followed by dc.pp.rl.ac.uk:0.0 and also Home set to H: System variables * Edit Path and add ;S:\bin to the end.pptandWord tricks
ppt: getting master page to work, word: track changes, hyperlinkshyperlinks
- Go to the Design tab
- Click on the arrow down in Colors
- Click on Create New Theme Colors at the bottom of the drop down bar
- In the menu that pops up, click the arrow next to Hyperlink- choose the desired color of the link.
- Under this you will see Followed Hyperlink-select the same color as the above to maintain the previous color (shown below).
- Next to Hyperlink, click the arrow and choose whatever color you prefer for your presentation.
- Choose the same color for the Followed Hyperlink if you want the color to remain the same after it is clicked on (and to avoid the usual maroon used hyperlink look).
Change the fonts in a footer on a slide
    On the View tab, click Slide Master.
    At the top of the thumbnail pane, click the slide master to select it.
    Highlight any footer elements (such as date, footer text, or slide number) on the slide master,
    and then on the Home tab, choose the font formatting you want in the Font and Paragraph groups.
ppt slide numbers Insert Slide Numbering on Slides, Notes, and Handouts
    Click the View tab, and then click the master view (Slide Master, Handout Master, or Notes Master) button
    with the master you want to change.

    Select the master or layout in which you want to insert a slide number, if available.
- pptx, go to 'Insert' tag => 'Header and Footer' tag => click/choose
- ppt => go to Normal View -> View -> Header and Footer : tick windows required, choose UK date syntax etc
Excel to C++ and to Web
Notes to convert an xls file to a CSV (comma delimited file) before reading with C++- in xls file, go to 'Save as' => 'Other formats' and choose 'CSV (comma delimited file)' from the drop down 'Save as type:' menu
- Be careful here, long integer numbers can get cropped to scientific notation if xls takes you around the save loop twice, and you risk losing the least significant bit field !!!!!!
- Cannot save to an ordinary txt file since that has been seen to crop the xls contents if it has too many columns!!!!!!
- Now prepare prn file for reading by C++ =>
- Replace all double commas ',,' if they occur, by a space
- then replace all single commas with a space
- check if words/phrases need spaces removed for them to be read as single C++ char strings
Julians instructions to convert an xls file to html link.
Web searching
Search hints| Syntax | Explanation |
| word | Search for documents containing a word. eg: higgs |
| "word1 word2" | Exact search for adjacent words, eg: "higgs boson" |
| Albert Einstein | Use uppercase (capital) letters to identify proper names |
| This is equivalent to the term "Albert Einstein" | |
| W3C | Uppercase matches only exact case. That is, W3C does not match w3C w3c W3c |
| Lowercase matches both cases | |
| goose | Stemming. goose also searches for documents containing geese |
| term1 term2 | Either term1 or term2, eg: "top quark" "beauty quark" |
| +term | Search for the exact term. eg: +lepton +"Higgs boson" |
| -term | Exclude given terms, ie: star -movie |
| ie: +"proton decay" -SUSY -"super symmetry" | |
| logic | (movie AND star) OR (famous AND people) |
| phoenetic | soundslike:shakespear |
| approx spelling | spellslike:exlaead |
| before | movie star before:2004/05/21 |
| after | movie star after:2004/05/21 |
| site specific | movie star site:flickr.com |
| near, next | movie NEXT star, movie NEAR star |
PuTTY sessions
Set prefrences, in 'Category' column on LHS, for SSH- Click on X11
- Check 'Enable X11 forwarding' and 'X display location' as 'localhost:0.0'
- In 'Window' choose columns and rows
- Return to 'Session' at top of Categories
- In main field, Under 'Load, save or delete a stored session' click ONCE on 'tocern' to see it in the 'Saved Sessions' box
- Click 'Save' button
- Click on 'Default Settings to compare/contrast
- Double click on 'tocern' for the session itself
- firefox &
- on command line should bring up a separate firefox window
- emacs &
- on command line should bring up a separate emacs window
- left click/drag to select in putty window
- right click/paste to finish
- from ie NotePad, right click/copy
- In putty window, right click to paste
- select and copy a rectangular region in PuTTY:
- hold down ALT, click/drag from top left to bottom right
- CTRL+V to paste
Batch Jobs in CMS
Screen saving
- Press "F-key" and then "Print Screen" key
- Then paste into ppt or other file
- Can also use the 'snipping' tool. Go to 'Accessories' and find/use the snipping tool
- Press Alt+PrtScn.
Map Network Drive and pptp
- Follow PPTP setup as in pdf file
- Click on Computer
- Click on 'Map Network Drive'
- Click/choose Drive: letter
- Enter the \\ address details in Folder:
- Click Finish, or just kill window - the Drive map is saved
- Start PPTP
- Go to Computer
- See the Network drive possibilities under 'Network Location'
- Click location required - a correpnding page should open
- This may shut out other locations.
- configure browser to use the RAL web cache for the PPTP connection.
- for IE, select 'Tools' then Internet Options
- select the connections tab
- In the Dial-up and Virtual Private Network settings box, select the name of your PPTP connection
- Click the 'Settings....' button (not the LAN Settings.... button bottom right.)
- configure the web cache:
- Select 'Use Automatic Configuration Script'
- Enter http://wwwcache.rl.ac.uk/proxy.pac
- add-on for Firefox, with the dubious name 'foxy proxy' that fixes the problem
Edit eps files
- In Linux, go to Graphics->GIMP Image Editor
- Open the eps file in question
- in Edit, use Cut to remove unwanted areas
- Go to Tools->Transform Tools->Crop&resize to remove white areas following a cut.
- Save as - to save as a new eps file
- Re-open - do further editing to crop etc
Tar and untar files
- To group multiple files : tar -cvf foo.tar a.dat b.dat c.dat ( this will group files [a-c]*.dat to one file foo.tar )
- c = create a tar file
- v = verbose( nothing important :P )
- f = create the tar file with filename provided as the argument
- To tar files and gzip them : tar -czf foo.tar.gz *.dat ( this will create a gzip-compressed Tar file of the name foo.tar.gz of all files with a .dat suffix in that directory )
- To untar(separate) files from a tar archive : tar -xvf foo.tar ( this will produce three separate files a.dat, b.dat and c.dat )
- To untar(extract) a gzipped tar archive file : tar -xzf foo.tar.gz
- To untar a bzipped (.bz2) tar archive file : tar -xjf foo.tar.bz2
CMS e-groups
Network connection
Need remote with cernts.cern.ch.My PC
SLC6 installation
Needed- 'yum install xterm' to create xterms remotely, ie to help desk with xterm -display sercopc02:0.0
- Not seeing afs directories: needed to add my cern account using 'addusercern usrn'
- 'ssh -Y davec@pcralxp4' to get lxplus/afs
svn
| svn manual |
svn EGM-11-001 area |
svn-notes.txt | svn-examples.pptx |
- Shervin's ECALELF area is at: https://svnweb.cern.ch/cern/wsvn/analysis/
- Calibration files at https://svnweb.cern.ch/cern/wsvn/analysis/trunk/calibration/
- Instructions: https://svnweb.cern.ch/cern/wsvn/analysis/trunk/calibration/README
The recommended release for 2012 data is the 5_3_3_patch3
The recommended release for 2011 data is 4_2_8_patch3

# Download the ECALELF package from the ***src**** directory !!!!!!!

svn co --depth empty svn+ssh://svn.cern.ch/reps/analysis/trunk/calibration/
# this creates a new empty directory: 'calibration'
# --depth means
# empty means

# in my linux directory, change to the new calibration directory:
cd calibration

# now update with the directories and contents of all the following directories with the corresponding contents on svn:
svn update SANDBOX EleNewEnergiesProducer EleSelectionProducers ZNtupleDumper README ZFitter

# go to my new SANDBOX directory
cd SANDBOX/

### if you are not Shervin download this to have some additional useful scripts
if [ "$USER" != "shervin" ];then
svn co svn+ssh://svn.cern.ch/reps/analysis/trunk/bin bin
# creates directory 'bin' and copies over the svn bin directory contents which has useful .sh files

# BE SURE to add this directory to my default PATH variable
# for bash
PATH=$PATH:$CMSSW_BASE/src/calibration/SANDBOX/bin
# for tcsh
setenv PATH $PATH":$CMSSW_BASE/src//calibration/SANDBOX/bin" # (I think)
###
fi

# from the SANDBOX directory run the file applyPatches.sh in the /scripts/ directory
./scripts/applyPatches.sh
cd ../..
Example for papers:
> svn co -N svn+ssh://svn.cern.ch/reps/tdr2 myDir
> cd myDir
> svn update utils
> svn update -N papers
> svn update papers/BPH-09-001
> eval `papers/tdr runtime -csh` # for tcsh. use -sh for bash.
> cd papers/BPH-09-001/trunk
Example for notes:
> svn co -N svn+ssh://svn.cern.ch/reps/tdr2 myDir
> cd myDir
> svn update utils
> svn update -N notes
> svn update notes/EGM-11-001
> eval `papers/tdr runtime -csh` # for tcsh. use -sh for bash.
> cd notes/EGM-11-001/trunk
There, get tex file and sub tex files etc. In the figures directory get the png and pdf files.
vnc
- Chris Jones old usage example
- LHCb example
- realvnc
- vnc at hep Cambridge
Twiki notes
About Twiki pages
<LINK href="/twiki/pub/TWiki/KupuContrib/kuputwiki.css" type=text/css rel=stylesheet>
<style type="text/css" media="all">
pre {text-align: left; padding: 10px; color: black; font-size: 12px;}
pre.command {background-color: lightgrey;}
pre.config {background-color: lightblue;}
pre.code {background-color: lightpink;}
pre.output {background-color: lightgreen;}
pre.file {background-color: lightyellow;}
pre.note {background-color: white;}
</style>
Then explain "In this tutorial page, the following text background color convention is used:"
<verbatim class="command">
GREY: For commands.
</verbatim>
<verbatim class="output">
GREEN: For the output example of the executed commands (nearly what the user should see in his/her terminal).
</verbatim>
<verbatim class="code">
PINK: For CMSSW parameter-set configuration files.
</verbatim>
<verbatim class="config">
BLUE: For CRAB configuration files.
</verbatim>
<verbatim class="file">
YELLOW: For any other type of file.
</verbatim>
To hide/show sections:
%TWISTY{mode="div" showlink="Show " hidelink="Hide "  firststart="hide"
showimgright="%ICONURLPATH{toggleopen-small}%"
hideimgright=%ICONURLPATH{toggleclose-small}%"}%

Your stuff to show/hide

%ENDTWISTY%
To change page characteristics, new parent etc: Go to "More topic actions" at bottom of page
At "Current Parent", check drop down list, highlight and "set new parent" Greek letters:
θ Θ etc*Superscript and subscript: *
You can use html tags to subscript and superscript
You can use html tags to <sub>subscript</sub> and <sup>superscript</sup>To comment out a number of lines
<!--
....line n
....line n+1
-->
Emacs
Emacs init file to set up ppearance etc
http://ergoemacs.org/emacs/emacs_make_modern.html
(set-background-color "honeydew")
Save it at ~/.emacs.d/init.el
Emacs crib!
- Ctrl = Control = C, thus Control-a written as C-a
- Alt = Meta = M, thus Meta-a written as M-a
type C-x C-s or select Save Buffer from the Files menu. Emacs writes the file. To let you know that
the file was saved correctly, it puts the message Wrote filename in the minibuffer.
To completely close and exit Emacs
hit the keys Ctrl + x, followed by Ctrl + c.
Emacs uses buffers to store the contents of a file, so there can be multiple buffers open at once.
To close a particular buffer, hit the keys Ctrl + x, followed by k, and then enter the buffer name.
Search
C-s forward search
C-r reverse search
search
Repeated search
Copy a rectangle area
Alt-x set-mark
Move cursor to diagonally opposite corner
Alt-x kill-rectangle
Move cursor to new position for rectangle
Alt-x yank-rectangle
15.10.4 Query Replace
Alt-shift-% string RET newstring RET
Replace some occurrences of string with newstring.
Answer each highlight with "y" or "n" C-M-% regexp RET newstring RET
Replace some matches for regexp with newstring.
- Ctrl-Alt-n to match curly brackets from top bracket,
- Ctrl-Alt-u from bottom. Put cursor ON bracket.
ie, via ubuntu window davec@dcockerill-pc01
In .bashrc set alias ls='ls -al' to see hidden files, if ls not already an alias
ls -a               gives:
.  ..  .bash_history  .bash_logout  .bashrc  .profile  .ssh  .sudo_as_admin_successful  .viminfo  .Xauthority
The emacs directory  .emacs.d is not listed

emacs fn          error comes back:
Command 'emacs' not found, but can be installed with:

sudo apt install emacs25
sudo apt install emacs25-nox
sudo apt install e3
sudo apt install emacs25-lucid
sudo apt install jove

>> sudo apt  install emacs25

Now get:
ls -a
.   .bash_history  .bashrc   .cache    .profile  .sudo_as_admin_successful  .Xauthority
..  .bash_logout   .bashrc~  .emacs.d  .ssh      .viminfo
Emacs now installed successfully.
XML
XML tutorialEduroam
- Installer at \\hepwin2008f.pp.rl.ac.uk\packages$ s: drive into a folder called Eduroam
- Run stfc-su1x-setup.exe
- Username put {fed-id}@stfc.ac.uk and password put your fed-id password
Windows problems
Can't see memory disk0) Check you are plugging it into the correct computer !!!!!!!!!!!!!
1) Press Windows 'Logo Key' + R
    type diskmgmt.msc into the Run dialog, and press Enter.

2. Locate your external hard drive, right-click and select Change Drive Letter and Paths. ...
You can view and check your hard drive on Windows 10/8/7/Vista PCs again.
-- DavidCockerill - 27-Jul-2010
- ROOT_for_beginners_Day1.pdf: Root FAQs Day 1
- ROOT_for_beginners_Day2.pdf: ROOT FAQs Day 2
- VOMS-registration-how-to.pdf: VOMS-registration-how-to.pdf
- VOMS-registration-how-to.pdf: VOMS-registration-how-to.pdf
- svn-notes.txt: svn-notes.txt
- Git-search-and-faqs.pdf: Git-search-and-faqs.pdf
- Character_Entity_Reference_Chart.htm: Character_Entity_Reference_Chart.htm</verbatim>
- tutorial_2011.pdf: tutorial_2011.pdf</verbatim>
- svn-examples.pptx: svn-examples
- mac-apps-22Aug2019.pptx: mac-apps-22Aug2019.pptx
- MAC-printing-after-os-upgrade.pptx.pdf: MAC-printing-after-os-upgrade.pptx.pdf
- Screen_Shot_2019-12-08_at_10.47.38.png:
- Screen_Shot_2019-12-08_at_10.48.33.png:
- Screen_Shot_2020-01-12_at_16.37.30.png:
- Screen_Shot_2020-01-12_at_16.34.42.png:
- Screen_Shot_2020-01-12_at_16.32.05.png:
- Screen_Shot_2020-01-12_at_16.31.38.png:
- Plot-Digitizer-README_copy.txt: Plot-Digitizer-README_copy.txt
- RAL-MAC-eduroam-14Jan2020.pdf: RAL-MAC-eduroam-14Jan2020.pdf
- CERN-PC-Eduroam-18March2021-The_certificate_expires_in_1_day.pdf: CERN-PC-Eduroam-18March2021-The_certificate_expires_in_1_day.pdf


Topic revision: r172 - 2022-11-18 - DavidCockerill
Webs
- ABATBEA
- ACPP
- ADCgroup
- AEGIS
- AfricaMap
- AgileInfrastructure
- ALICE
- AliceEbyE
- AliceSPD
- AliceSSD
- AliceTOF
- AliFemto
- ALPHA
- Altair
- ArdaGrid
- ASACUSA
- AthenaFCalTBAna
- Atlas
- AtlasLBNL
- AXIALPET
- CAE
- CALICE
- CDS
- CENF
- CERNSearch
- CLIC
- Cloud
- CloudServices
- CMS
- Controls
- CTA
- CvmFS
- DB
- DefaultWeb
- DESgroup
- DPHEP
- DM-LHC
- DSSGroup
- EGEE
- EgeePtf
- ELFms
- EMI
- ETICS
- FIOgroup
- FlukaTeam
- Frontier
- Gaudi
- GeneratorServices
- GuidesInfo
- HardwareLabs
- HCC
- HEPIX
- ILCBDSColl
- ILCTPC
- IMWG
- Inspire
- IPv6
- IT
- ItCommTeam
- ITCoord
- ITdeptTechForum
- ITDRP
- ITGT
- ITSDC
- LAr
- LCG
- LCGAAWorkbook
- Leade
- LHCAccess
- LHCAtHome
- LHCb
- LHCgas
- LHCONE
- LHCOPN
- LinuxSupport
- Main
- Medipix
- Messaging
- MPGD
- NA49
- NA61
- NA62
- NTOF
- Openlab
- PDBService
- Persistency
- PESgroup
- Plugins
- PSAccess
- PSBUpgrade
- R2Eproject
- RCTF
- RD42
- RFCond12
- RFLowLevel
- ROXIE
- Sandbox
- SocialActivities
- SPI
- SRMDev
- SSM
- Student
- SuperComputing
- Support
- SwfCatalogue
- TMVA
- TOTEM
- TWiki
- UNOSAT
- Virtualization
- VOBox
- WITCH
- XTCA
Welcome Guest Login or Register
 |
|
or Ideas, requests, problems regarding TWiki? use Discourse or Send feedback