TWiki> Main Web>TWikiGroups>LHCbEdinburghGroup>LHCbEdinburghGroupRoot (2010-12-22, RobCurrie)
 EditAttachPDF
This is the LHCb-Edinburgh page on tips for using root
Installing Root locally
This seems to be shrouded in mystery because nobody just writes down a simple script to tell you what to do: (I believe ubuntu users have a build in a repo somewhere but that's your choice)Building
grab the latest source or the latest tar, I recommend using svn head, although building this can have issues:svn co http://root.cern.ch/svn/root/trunk rootfollow the instructions on http://root.cern.ch/drupal/content/installing-root-source
export ROOT_PATH=~/root-install && ./configure --build=debug --prefix=$ROOT_PATH --etcdir=$ROOT_PATH/etc --other-optionsthe default etc path is /etc which seems only a good idea when you have 1 root version installed. NB: --build=debug makes root a bit slower due to the increased binary sizes, however I find it helps when debugging complex progs making extensive use of root using
make -j4where 4 is n+1 number of cores on your machine will speed up this build process
Release binary
Grab the latest (pro) version from http://root.cern.ch/drupal/content/downloading-rootInstalling
Custom binary
simply typemake installand check you have writes to the directory your trying to install into
Release Binary
using the downloaded .tar.gz run:tar -zxf downloaded_file.tar.gz -C /some/pathwhere some path is the directory you wish to install root
Using root
To use/build against root you need to have it setup on your system. Either run the following sequence every time you want to work with it or simply add it to .bashrc toexport TEMP_PATH=$PWD export ROOT_PATH=/path/to/root/files source bin/thisroot.sh cd $TEMP_PATH unset TEMP_PATHI recommend adding this to .bashrc as it's lightning fast anyway

Tips for Using Root
Setting Root with CMT
The LHCb software includes several distributions of Root, among which you can find the one needed when submitting a Root job through Ganga. Without going into details on dealing with CMT (documentation- with the LHCb software on, start by creating a new CMT project from your top directory:
cmt create_project lhcbRoot v1r0 cmtuserwhere lhcbRoot is the project name, v1r0 is the version and cmtuser is a path. You should now get something like:
% ls cmtuser/lhcbRoot/v1r0/
cmt/
% ls cmtuser/lhcbRoot/v1r0/cmt/
project.cmt
- edit the project.cmt file and add the lines:
use LCGCMT v*this is telling CMT that you need the latest version of the package LCGCMT. Now create a requirements at the same place. In here, you are going to specify that from the lcg software area, get the environment for Root i.e. the variables ROOTSYS, PATH and LD_LIBRARY_PATH will point to the requested version. In this example, we want the latest version and some other packages found in the lcg software area:
package lhcbRoot
version v1r0

use ROOT          v* LCG_Interfaces
use Reflex         v* LCG_Interfaces -no_auto_imports
use gfal             v* LCG_Interfaces
use dcache_client v* LCG_Interfaces
use GSL            v* LCG_Interfaces
- Now you can do cmt config and source setup.sh{csh}. The selected Root should now be ready for you.
Using root in Ganga
Root is controlled with ganga in three separate ways.- The version of root used by Ganga to do merging etc.
- Using a precompiled executable
- Using a root macro with precompiled code in a shared object.
Depending what you want to do, you may need to change your ROOTSYS variables. Locally versions of root can be found in /opt/root, /Disk/lochnagar0/lhcb/lhcb-soft/lcg/external/root and /Disk/lochnagar0/general/root. /opt/ is ifp-controlled. lcg/external/ are the versions of root which are available with DaVinci, general/root are compiled by Barney/Greig which we can essentially play around with.
- The type which root at the command line in ganga to see what version of root you are using in the subshells of ganga. Type config.ROOT to see which version of root Ganga is using as standard. To ensure merging works correctly a single version of root should be chosen, the same version for the creation and merging of files. Edit your .bashrc and your .gangarc to give the same version of root. Locally this means setting the config.ROOT.path variable to point to an install of root. This is equal to your ROOTSYS variable in your .bashrc.
- You may have compiled root code. Probably, though, it still needs some shared objects from Root. Ensure you have compiled and run your code with the same version by checking that your gangarc and bashrc agree with what you compiled. Within ganga, precompiled code can be run in the executable, although you will need to use a shell script wrapper to set ROOTSYS before running your code.
- The Root() application provides a nice way of working locally and on the grid with shared objects. To run on the GRID the version of Root you choose must correspond to a version available with a DaVinci release.
Better colour schemes
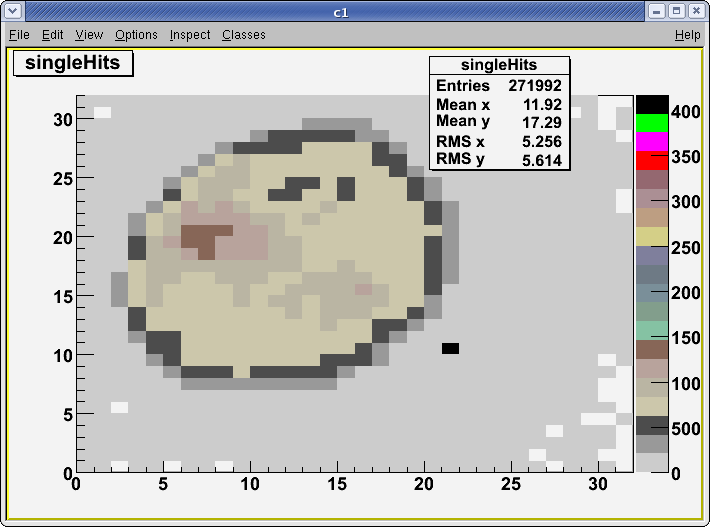
The default colour scheme in Root is terrible. The following 2 lines fix this and should probably be in (the very beginning of) every Root macro that plots something: gROOT->SetStyle("Plain") gStyle->SetPalette(1)- The horrible default colour scheme for a ColZ plot:
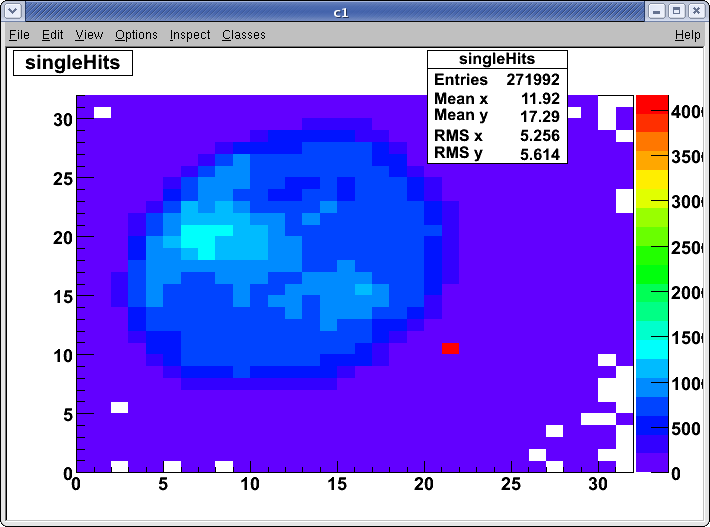
- What the above 2 lines give you. Now the ColZ plot has sensible colours:
Root Quirks
Root has several quirks which don't agree with everyone. I will try to give an example as to how to get rid of some of the bigger ones. (This will reduce the root program to a single root terminal on running and nothing more)Removing the Splash
This actually seems to increase the time taken for root to login... bad coding on their part or bad X11 behaviour on my mac I don't know. add the following line to your .bashrc file for bash users, for tclsh and other users try using set-env with thisalias root='root -l'
Removing the text splash
This is useful when you have many terminals, a small screen or limited terminal space. To get rid of this you need to create and edit a file called .rootrc in your home directory create it:touch .rootcadd the following line:
Rint.WelcomeLite: yesMy .rootrc has a slightly larger history than normal (i forget useful command tricks so I find it useful to have them around for longer so I can reference them)
Rint.HistSize:          2048
Rint.HistSave:          2048
Rint.WelcomeLite:       yes
Root.MemStat:           1
Root.ObjectStat:        1
Unix.*.Root.UseThreads: true
Root.MemCheck:          1
Rint.Logon:             $HOME/.rootlogon.C
I recommend using the bottom line as well as this allows you to have a short script in ~/.rootlogon.C rather than ~/rootlogon.C (i.e. hides the config file

Making root more palletable
create a file ~/.rootlogin.C or ~/rootlogon.C Mine looks like:
{
// These options make root look more pleasant
//gStyle->SetLineColor(2);
gStyle->SetCanvasColor(10);
gStyle->SetStatColor(10);
gStyle->SetTitleColor(1);
gStyle->SetPadColor(10);

// I prefer this as it's nice and clear :)
gROOT->SetStyle("Bold");

gStyle->SetPalette(1);

// Settings for statistics information
gStyle->SetOptFit(0);
// Removes the stats box from the upper right hand of the plots I usually use this unless I want to display specific stats info
//gStyle->SetOptStat(0);
// Default amount of info in stats box, higher numbers correspond to different levels of verbatim
gStyle->SetOptStat(1);
gStyle->SetLabelColor(4,"xyz");
gStyle->SetFuncColor(4);
gStyle->SetFuncWidth(3);
//gStyle->SetLineColor(2);

}
Most of the commands above can just be added to the top of a root script you write, however they're (imo) worth always running.
Compiling Programs using Root and Cmake
Since I have discovered how to do this I will even further avoid the root console (imo only good for loading the TBrowser object, and I am tempted to just write a shortcut to access this without root) I cannot stress how beneficial this is to code performance just addressing things such as the fitter externally is a lot better than letting CInt handle anything!!Setting Up the Root Environment
Compiling code against root requires root be setup correctly. Many people seem to have their own Makefiles and environments setup to do this, but I try to do it as close to the way root demands which makes my life easier in the long term. This can be accomplished by adding 2 lines to your .bashrc file if you're a bash user: (Here I assume that you know where root is on your system or that you have downloaded and extracted a copy of the root tarball and have the correct dependencies installed) (On the Edinburgh machines the path to root is: /Disk/lochnagar0/general/root/5.25.04_gcc41/ ) I will write this for the edinburgh machines (running bash) and leave people to change the path to their root install as appropriate: add the following series of commands to your .bashrc file. (for tclsh there exists a thisroot.csh)export TEMP_PATH=$PWD cd /Disk/lochnagar0/general/root/5.25.04_gcc41/ source bin/thisroot.sh cd $TEMP_PATH unset TEMP_PATHThis makes root now setup in your current path. You can always make this into a small script, however this doesn't effect login times unless disk access is slow.
Setting Up Cmake (required in edinburgh I think, I found no centrally installed binary)
cmake is installed at CERN on lxplus, however is not in the default path on the edinburgh machines. @ Edinburgh
mkdir -p $HOME/{install/bin,src}
cd ~/src && wget http://www.cmake.org/files/v2.8/cmake-2.8.2.tar.gz && tar -zxf cmake-2.8.2.tar.gz && cd cmake-2.8.2
./configure --prefix=$HOME/install && gmake && gmake install &&  ## go grab a Coffee after running this line
## use ' not " as it wrecks with the bash interpretor ##
echo 'export PATH=$PATH:$HOME/install/bin' >> ~.bashrc && source ~/.bashrc
Following the above installs cmake in ~/install on your personal space.
Configuring your Project
Cmake is a program to control, generate and maintain Makefile s across a project. It is intended to take away the problems of using things such as autoconf, automake and aclocale from the user. IMO it does a VERY good job of this
It also allows the program to be built out of of source which means your source directory is kept clean from .o files during compilation and linking.
Cmake is capable of automatically compiling files as .o objects and only rebuilding the required files each time.
And the golden gem of cmake is that once it has been run once it only ever needs to be run ONCE correctly. You can forget it's there and just use make like you normally most of the time.
I cannot sing the praises of cmake highly enough.
Cmake looks for a file called CMakeFile.txt (Caps insensitive) within the required directories of a project and generates the relevant Make files
First you need to grab a Cmake module (don't be afraid, this file makes cmake do all the complicated work for you) FindROOT.cmake. This file allows you to search your system for root and extract the useful root parameters.
A friendly ALICE user uploaded a working module to googlecode, if this ever vanishes (I'd be shocked) pm me (RobCurrie) and I will fwd you a copy.
to grab the file:
cd $ROOTSYS
wget http://alimv.googlecode.com/svn-history/r2/trunk/cmake/modules/FindROOT.cmake
I have stored a copy of mine in $ROOTSYS which makes it easy to find later on Now you have this file time to write your CMakeLists.txt file for your project.
topdir CMakeLists.txt
In the root (top directory) of your project the CMakeLists.txt will look something like the one below:
CMakeLists.txt ---------------------------------------------------------------------------------------------------------------------------
#Some Defaults to allow people to just use the file
CMAKE_MINIMUM_REQUIRED( VERSION 2.6 )
MARK_AS_ADVANCED( CMAKE_BACKWARDS_COMPATABILITY )
SET( CMAKE_ALLOW_LOOSE_LOOP_CONSTRUCTS TRUE )


# Put the completed Binaries in the ./bin folder
SET( EXECUTABLE_OUTPUT_PATH "${CMAKE_BINARY_DIR}/bin" )


#  Get back the old style verbosity :)
#SET(CMAKE_VERBOSE_MAKEFILE 1)
SET(CMAKE_VERBOSE_MAKEFILE 0)


# Set Project name and version
PROJECT( projectname )
SET( ${PROJECT_NAME}_MAJOR_VERSION 0 )
SET( ${PROJECT_NAME}_MINOR_VERSION 1 )
SET( ${PROJECT_NAME}_PATCH_LEVEL 0 )


# Tell CMAKE where to find the FindRoot.cmake file you just downloaded
SET( ROOTSYS $ENV{ROOTSYS} )

IF(NOT ROOTSYS)
    Message(FATAL_ERROR "${ROOTSYS} not defined, please setup the root environment before the build" )
ENDIF(NOT ROOTSYS)

SET(CMAKE_MODULE_PATH ${ROOTSYS} )
INCLUDE( FindROOT.cmake )


# Either tell Cmake you want a typical build type and it chooses sensible compiler tags or select your own (which overides the CMAKE_BUILD_TYPE flag)

#SET(CMAKE_BUILD_TYPE Release)
SET(CMAKE_BUILD_TYPE Debug)
#
#  # These are the compilation options that you choose to build the project with
#  SET( CMAKE_CXX_FLAGS "-g -O2" )
#  SET( CMAKE_C_FLAGS "-g -O2" )

# This points the cmake file to your headers .h .hpp ... etc not always in your source tree I know
INCLUDE_DIRECTORIES( "${CMAKE_SOURCE_DIR}/src" )


# This does the fancy checking for root being available on your system and warns if it can't be found (also sets up the important root variables for later use
FIND_PACKAGE( ROOT )


# Every added subdirectory has to have an associated CMakeLists.txt file which acts (recursively?) on the folders below it in the filesystem
# these CMakeLists.txt must exist but can be empty (i.e. contain no further/extra instructions for cmake)

# Tell CMAKE where your source files are .C .cpp .c ... etc and add this to the list of folders in  the project
SET( PROJECT_SOURCE_DIR src )
ADD_SUBDIRECTORY( src )

CMakeLists.txt ---------------------------------------------------------------------------------------------------------------------------
Short & Sweet
(compared to a hand written Makefile)
src/CMakeLists.txt
In your ./src/ directory (because you just included it) add a CMakeLists.txt file which looks something like:
src/CMakeLists.txt ---------------------------------------------------------------------------------------------------------------------------

# Tell CMAKE about your files so it can resolve dependencies between your files and know what order to compile objects
SET( SRCS file1.C file2.C file3.C file4.C file5.C )


# I typically have one main() in main.C and I just call my executable run, this is your choice but you normally want yo just generate a binary to run
# tell CMAKE you want a binary from this file containing main() and what it links against (root)
ADD_EXECUTABLE( run ${SRCS} )
TARGET_LINK_LIBRARIES( run ${ROOT_LIBRARIES} )

src/CMakeLists.txt ---------------------------------------------------------------------------------------------------------------------------
Even Shorter (aside form my comments and extra verbosity)
Compiling
Now you have your CMakeLists.txt files in the right places you simply type from the topdir.cmake ./Now to compile your program type make from either the topdir or the src directory to rebuild the project
-- RobCurrie - 08-Oct-2010 

| I | Attachment | History | Action | Size | Date | Who | Comment |
|---|---|---|---|---|---|---|---|
| |
BadColourScheme.png | r1 | manage | 31.9 K | 2007-11-12 - 17:19 | YoungMinKim | Bad Colour Scheme - a horrible ColZ plot |
| |
GoodColourScheme.png | r1 | manage | 31.2 K | 2007-11-12 - 17:20 | YoungMinKim | A logical colour scheme. Now the ColZ plot has sensible colours |
| |
Makefile | r1 | manage | 1.9 K | 2008-09-09 - 17:12 | UnknownUser | Greig's RooFit Makefile |
Webs
- ABATBEA
- ACPP
- ADCgroup
- AEGIS
- AfricaMap
- AgileInfrastructure
- ALICE
- AliceEbyE
- AliceSPD
- AliceSSD
- AliceTOF
- AliFemto
- ALPHA
- Altair
- ArdaGrid
- ASACUSA
- AthenaFCalTBAna
- Atlas
- AtlasLBNL
- AXIALPET
- CAE
- CALICE
- CDS
- CENF
- CERNSearch
- CLIC
- Cloud
- CloudServices
- CMS
- Controls
- CTA
- CvmFS
- DB
- DefaultWeb
- DESgroup
- DPHEP
- DM-LHC
- DSSGroup
- EGEE
- EgeePtf
- ELFms
- EMI
- ETICS
- FIOgroup
- FlukaTeam
- Frontier
- Gaudi
- GeneratorServices
- GuidesInfo
- HardwareLabs
- HCC
- HEPIX
- ILCBDSColl
- ILCTPC
- IMWG
- Inspire
- IPv6
- IT
- ItCommTeam
- ITCoord
- ITdeptTechForum
- ITDRP
- ITGT
- ITSDC
- LAr
- LCG
- LCGAAWorkbook
- Leade
- LHCAccess
- LHCAtHome
- LHCb
- LHCgas
- LHCONE
- LHCOPN
- LinuxSupport
- Main
- Medipix
- Messaging
- MPGD
- NA49
- NA61
- NA62
- NTOF
- Openlab
- PDBService
- Persistency
- PESgroup
- Plugins
- PSAccess
- PSBUpgrade
- R2Eproject
- RCTF
- RD42
- RFCond12
- RFLowLevel
- ROXIE
- Sandbox
- SocialActivities
- SPI
- SRMDev
- SSM
- Student
- SuperComputing
- Support
- SwfCatalogue
- TMVA
- TOTEM
- TWiki
- UNOSAT
- Virtualization
- VOBox
- WITCH
- XTCA
Welcome Guest Login or Register
 |
|
or Ideas, requests, problems regarding TWiki? use Discourse or Send feedback